For protection purposes environment or your own convenience.
Did you know that you can make a New Year's beauty from items that you have in the house? And if you like to place small Christmas trees around the rooms, then you can make them from paper according to step-by-step instructions.
I continue to show the most interesting options DIY home or office decorations for the New Year holiday. Let's make Christmas trees out of paper and cardboard, which can be found in every home.
Don't forget to be creative to make your work exclusive. I show the principle of creation, you choose the color and material for production yourself.
First, I show you what the end result will look like, if you like it and have an idea of what material you will make it from, how you will decorate it, then read on and look at the photo on how to make such a Christmas tree.
Christmas tree from magazines
Prepare 2 magazines of the same size...preferably one edition. Because the number of pages, their size and paper thickness must be the same. You can take an old book that you can tear, it doesn’t have to be in color, it can be a regular black and white one.
You will also need PVA glue and if you have wine corks, prepare 5 pieces for a stand under the Christmas tree.
We take one magazine, open the last page and begin to fold it as in the photo.

First, fold it in half under the corner, then fold the folded page in half again.

We press our fingers tightly along the folds so that the folded page becomes flat.
At the bottom, outside the magazine, there is an extra corner sticking out; we bend it along the edge of the magazine and hide it inside the page folded into a triangle.
The page turned out to be a triangle with a sharp end at the top. We bend it to the left, and on the right half of the magazine we fold the next page in exactly the same way. And then all the pages to the end.
We do the same work with the second magazine.
If the covers of magazines are the same density as the pages, then we also fold triangles out of them. And if not, then the covers need to be torn off or carefully trimmed.
So, the pages of the two magazines became in the form of triangles, we put them against each other with the sides where the covers were and carefully glue them in the center.
The actual Christmas tree from the magazine is ready. You can leave it as it is, or you can make a stand from wine corks, for example. We glue 5 identical corks with barrels facing each other and this structure will stand steadily on the table; we place the Christmas tree on it with glue.
As a stand, you can use any object that fits - a box, a jar, a glass...
The Christmas tree can be left as is, or you can decorate it with beads and tinsel.
The same Christmas tree can be made from an old book. To do this, you need to tear it apart or tear off 2 parts with approximately an equal number of pages.
We fold it the same way as magazines. Lubricate the finished Christmas tree with a little glue, maybe unevenly, and sprinkle it with glitter. You can spray the tree with green spray paint and immediately sprinkle with foam crumbs.
An unusually beautiful Christmas tree is obtained by folding magazine pages, as in the video.
Watch the master class.
Paper and cardboard crafts
If you have unnecessary cardboard from plain and multi-colored packaging or thick multi-colored packaging paper in your house, then I will show you how to make a Christmas tree using only scissors and glue. To make the Christmas tree more beautiful, stock up on curly paper scissors and a wooden skewer.

First, make blanks from circles of different diameters, 3 circles of the same size. Reduce the diameter of the following circles by 1 cm.
In the center of the circles, make holes the diameter of the skewer on which we will string them.
The diameter of the upper small circles is 2 cm.
The Christmas tree will turn out more beautiful if you cut out the circles with curly scissors.
Cut circles of about 2cm in diameter from plain cardboard to space between the colored circles. Also make holes in the center of the circles.
For the stand, cut out a cardboard square for the stand, insert a skewer into its center and add a drop of glue. The side of the square is 1 cm less than the diameter of the large circle.
We round the corners of the square or you can immediately cut out a circle for the stand.

We start assembling - we string the circles one by one, and between them we string a small cardboard circle.
We cut off the excess end of the skewer and glue a star made of bright or shiny material to the top of the Christmas tree.
Newspaper Christmas tree
Let's make a miracle out of newspapers! Surprise your family and guests!

First, we will learn how to make roses, using red paper as an example, but for our craft, I think newspapers are more original.
The number of roses depends on the size of the cone on which you will glue them.
Making paper roses
The execution diagram is in the photo, and read the description below.
We cut 10x10cm squares from newspaper, draw spirals on them and then cut them out. The thickness of the spiral is at least 1 cm.

We take the spiral and begin to roll it tightly, starting from the outer end. Roll it up tightly and secure the end with glue.
For the central part of the rose we make it smaller and for the top part even smaller.
If desired, beads of any color can be glued to the center of the roses. Or, on the finished Christmas tree, glue beads to the center of some roses, distributing them evenly. Beads can be either the same color or different colors.
We begin the assembly by gluing a cone from cardboard or Whatman paper; you can buy a ready-made foam cone. The cone needs to be covered with newspaper paper.
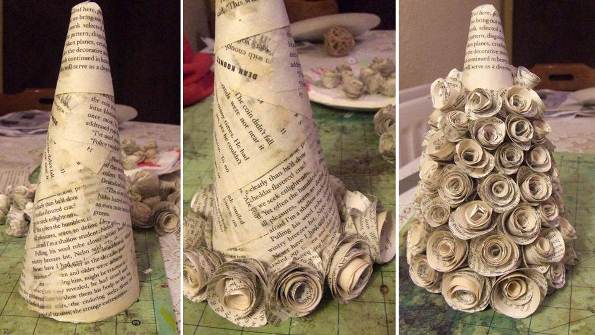
We start gluing the roses from the bottom, you can glue them tightly, or a little looser.
Decorate the top of the head with some small Christmas tree decorations or a star.
Making from cardboard rolls
Everything will come in handy on the farm! We don’t throw away cardboard rolls of toilet paper, we collect them and make a Christmas tree out of cardboard for the holiday.
Don't worry, no one will even guess what material this miracle is made of!
Watch the master class in the video and do it. Stop the video at the right places, then turn it on and watch it next stage, stop the video and continue with your work. You can go back the video by dragging the slider on the timeline to the left and view the desired segment again.
Happy creativity!
Today we have another crossword puzzle on the blog. Click on the picture of the crossword puzzle with answers and solve it quickly.
Passions flare up for first place in the tournament and I had to make the crossword more difficult.
Hurry up and submit your crossword puzzle quickly after the article is published! Crossword puzzles are published on Thursdays in a new article, which comes out at 17:00.

These master classes, which tell you how to make a Christmas tree with your own hands from glossy old magazines, will be useful for those who are not used to limiting their imagination to boundaries. Do you have magazines you've read a long time ago and some free time? Then we will describe in detail how to make unusual Christmas trees from magazines.
Five-minute Christmas treeTo make a miniature Christmas tree, we only need one magazine, glue, a stapler and five minutes! So, more about how to make a Christmas tree out of magazines.
Place the magazine in front of you, take the cover page by the upper right corner and fold it towards the endpaper, then in half again, and tuck the remaining corner under the page. Secure the folded cover page with a stapler. Then turn it over and do the same with the second page, but the stapler is no longer needed. It is enough to smooth the folds well so that the tree does not turn out to be too “plump”. Fold the remaining pages in the same way, and when all are ready, glue the last one to the first. The cute Christmas tree is ready! You can leave it as is, and if you have spray paint on hand, then decorate the Christmas tree to your liking.
 |
 |
 |
 |
 |
 |
 |
 |
Do you read a lot, but have nowhere to put magazines? Then this magazine craft in the shape of a huge Christmas tree is what you need! We will need several dozen magazines, wooden sticks, glue, wire, and a drill.
Divide the pages of each magazine into six equal parts and bend the sheets inward, first smearing their ends with glue. Place the resulting parts on 45-50 centimeter wooden sticks. Secure them with thick wire to the base trunk with holes made with a drill. For reliability, fasten all the branches together with thin wire. You can decorate such a Christmas tree from magazines with either a garland or small toys. But even in its original form, this beauty looks great, because the pages of glossy magazines shimmer with all colors.
Creative Christmas treeTo implement this idea you will also need a lot of magazines, but the craft is worth it. In addition to magazines, stock up on a wooden stand, a wooden dowel, glue, and some trusty, large scissors.
Let's start by installing a wooden rod on a wooden stand by drilling a hole in it.
Then we will determine how many magazines we will need. To do this, bring the stack to the rod. It is necessary that the stack of magazines be placed at a height from the base of the stem-trunk to its end (leave 3-4 centimeters to decorate the top of the tree). Then we divide the magazines into 4-6 piles. We don’t touch the first one, cut the magazines in the second stack by 5 centimeters, in the third by 10, in the fourth by 15, and so on. As a result, we should end up with magazines of different sizes. Slide them onto the rod, starting with the largest ones. The corners of the magazines should not match. You will get such an unusual Christmas tree.
We could finish here, but we have glue and glitter in stock, so let’s start decorating our creative Christmas tree. Carefully treat the tree with spray glue (you can use regular glue, but the process will take a lot of time). We don’t wait for the glue to dry, but immediately sprinkle the entire paper tree with colorful glitter. It is better to mix them first so that the colors apply evenly. Now we wait for the glue to dry completely. Then carefully blow off the remaining glitter and enjoy the result!
A Christmas tree from a magazine is a great idea for New Year's decor. Making such a craft will not be difficult; even a child can do it. All you need is an A4 magazine, you can grab a free catalog from the store. To make the tree bright and elegant, it is better to take a magazine with bright pictures, but this is not necessary, since we will use golden spray paint.
DIY Christmas tree from a magazine
How to make a Christmas tree from a magazine with your own hands
You will need:
- magazine
- glue gun
- spray paint
- decor (stars, beads, ribbons, beads, sparkles, sequins)
How to do:
On a flat surface, unscrew the last two sheets of the magazine and fold them as shown in the photo.

Fold the remaining sheets in the same pattern, gradually moving towards the first pages of the magazine. If the magazine pages are quite dense, you can fold them one page at a time.

After this, roll each folded page into a bag, holding the top of the future Christmas tree with your hand, as shown in the photo.

Tape each page tightly to the end of the magazine.

When the Christmas tree is ready, you can start painting. Spray paint from a can over the entire surface of the tree and let the paint dry.

When the paint is completely dry, you can start decorating. Using a glue gun, decorate the Christmas tree - decorate it with beads, sequins, and add sparkles. The Christmas tree from the magazine is ready!

How to make a Christmas tree from a magazine with your own hands video
Elena: Hello everyone! Those who came to visit us yesterday already know that a story competition “THE MOST UNUSUAL GIFT” has been announced. Tell us briefly why you received it, or maybe you yourself presented it to someone. Everything about the competition and two stories are already in the article, and your story will become the basis for the next publication. We wait!
In the meantime, we suggest you take a closer look at... which you are probably going to get rid of during the pre-New Year cleaning. Don't worry, we don't need all the garbage, just the old one glossy magazine or a colorful catalogue. It is now fashionable to make all kinds of crafts from them. Half an hour of time, a little imagination and creativity and you will have a gorgeous tree from a magazine.
Albert: Preparation before actual production Christmas trees from a magazine:
- You need a fairly thick glossy magazine with large, bright pictures. But, if you decide to paint the finished Christmas tree, the presence of pictures is not necessary; you can even use a book with black and white printed text.
- The size of a book or magazine is A4 format, give or take, the main thing is that the height is greater than the width.
- Number of pages - from 100 or more. You can use 2-3 magazines of the same size and paper quality. But even a “one-sided” tree looks original.
- If necessary, buy in advance a can of spray paint (green, white, etc.), decorations in the form of snowflakes, glitter, small Christmas decorations, prepare an awl, glue and scissors.

Manufacturing Christmas trees from a magazine:
1. We bend each sheet twice: the first time by the upper right corner at an angle of 45 degrees towards itself, then again in half diagonally already folded.

2. We smooth the fold lines properly with a finger or using a ruler so that the edges of the future “branches” look equally clear everywhere.
3. The bottom corner, which, when folded, ends up at the bottom and extends beyond the magazine, should be folded upward and hidden between the resulting fold of the page in a “pocket.”

4. Do similar actions with all leaves, including covers.
5. If the cover is thick, it can be torn off.
6. If you want to make a three-dimensional Christmas tree from a magazine, you should glue the covers together and roll them in the same way as a regular magazine sheet.
7. If necessary, paint the Christmas tree, decorate it with toys, and attach a star to the top of the head.
Elena: Alternatively, you can make a Christmas tree from a magazine like this:
1. Do not fold each page of the magazine, but cut it out according to the prepared template. Don't make the template too complex, with a lot of curves. The simple option, believe me, looks better.
2. For the first time, we apply the template, trace it, and cut it out. And then the cut page itself becomes a template for the remaining pages.
3. You should not cut out several sheets at once: the edges turn out torn, uneven, and the tree does not unfold well.
4. Decorate the Christmas tree in the same way as the first one and place it on the table to wait!

Such tree from a magazine may well replace a living forest beauty,
Craft: DIY Christmas tree
Today you can see a large variety of Christmas trees in stores. However, you don’t have to buy a New Year’s tree; you can make it yourself using almost any available materials. Of course, without a live Christmas tree at home new year holidays You just can’t do it, and a DIY Christmas tree will perfectly decorate your home or be suitable as a gift for friends and family.
Craft: Christmas tree with your own hands
Christmas tree made from magazine pages
To make a cute Christmas tree from magazine pages you will need:
- old magazine;
- PVA glue;
- cardboard;
- pen or pencil.
First of all, you need to make a cone out of cardboard and fasten it with glue. From the pages of an old magazine you should cut out neat circles or flowers of the same diameter.
The resulting circles need to be wrapped around a pencil. This way they will turn out a little curled. Next, you can begin gluing the circles to the cone, starting from the bottom. The circles should be glued by pressing them tightly together so that the cone itself is not visible. You can make a small cone from one circle and glue it instead of the top. The Christmas tree is ready.

Christmas tree from old magazines.
Video: DIY Christmas tree craft
Christmas tree made of wrapping paper
Making a Christmas tree from wrapping paper is very easy.
For this you will need:
- wrapping;
- cardboard;
- scotch;
- scissors;
- decorations.
As with most Christmas trees, first of all you need to make a cone out of cardboard or thick paper. If the wrapping paper you are going to use is thick enough, you can make a cone out of it.
The resulting cone can be secured with tape. Then you need to cover the cone with wrapping paper. To do this, place the paper on a flat surface with the beautiful side down. Then tape the end of the paper to the cone and slowly turn the cone to completely wrap it in wrapping paper.
Cut off the excess paper using scissors. All that remains is to decorate the paper Christmas tree. To do this, you can cut out stars and decorate them with sparkles, you can glue buttons, beads, tinsel, stickers or lace to the tree.

DIY Christmas tree made from wrapping paper
Crafts with children: glowing Christmas tree for the New Year
The illuminated Christmas tree looks very original and beautiful. To make such a Christmas tree with your own hands you will need:
- floral mesh;
- floral wire;
- cardboard;
- scissors;
- cellophane;
- PVA glue;
- pins;
- decorations.
First, make a cone out of cardboard. Wrap the finished cone in cellophane. Then cut the floral mesh into small pieces and coat with glue. Glue the resulting pieces of mesh onto cellophane. Secure the resulting structure with pins and wait until the glue dries completely. After the cone is dry, repeat everything done again. After the glue has completely dried, remove the cellophane from the cone. Secure the garland inside the cellophane using pins. You can decorate the Christmas tree to your taste.

The process of making a luminous Christmas tree

DIY glowing Christmas trees
Original Christmas tree made from pasta
To make an original Christmas tree from pasta you will need:
- foam cone;
- gouache, acrylic paints or spray paint;
- pasta of various sizes and shapes;
- PVA glue;
- brush.
First, paint the foam cone any color you like and let it dry. Then firmly glue the pasta to the cone. The design can be absolutely anything. Then apply paint to the pasta, carefully coloring all the details. It is better to paint the pasta in two layers. Let your Christmas tree dry thoroughly.

The process of making a Christmas tree from pasta

Fluffy Christmas tree made of colored paper
A Christmas tree made from ribbons of colored paper turns out to be very elegant. To make such a New Year's beauty yourself you will need:
- cone made of thick cardboard;
- colored paper;
- PVA glue;
- double sided tape.
First, you need to make a base for the Christmas tree; to do this, take a thick sheet of cardboard, roll it into a cone shape, securing it with glue. Then we make thin strips of colored paper, identical in length and width. Christmas trees made from green, red, silver and gold paper look very impressive. Using glue, we glue the strips along the edges, making loops from them. We attach the resulting loops to one side of the tape, and attach the other side to the cone in the direction from bottom to top. Thus, you get a funny fluffy Christmas tree.

The process of making a Christmas tree from strips of colored paper

DIY fluffy Christmas tree
Craft Christmas tree: 40 photos and master classes

Elegant homemade Christmas trees made from tinsel and balls

Children's craft: green Christmas tree made of cardboard or paper

New Year's craft with children: a tree made of pine cones and balls made of fabric or yarn

DIY colorful Christmas trees made from yarn

Children's craft: Christmas tree made of felt and buttons

Flat Christmas trees made from dishes - an unusual idea

How to sew an elegant Christmas tree - an idea for the New Year

How to weave a Christmas tree from beads with your own hands

Flat Christmas tree made of twigs for wall decoration

Beautiful DIY lace tree

Master class: three-dimensional Christmas tree made of paper using quilling technique

Stylish Christmas tree made of jute and beads

Craft a Christmas tree from plastic forks and other utensils

Miniature Christmas trees made of beads

Beautiful Christmas trees made of ribbons

How to make a Christmas tree from yarn and buttons with your own hands - master class

Small Christmas trees made of lace

Crafts - Christmas trees made of burlap and spices

Christmas tree made of coffee, beads and satin ribbons

Two Christmas trees made of pine cones

Knitted Christmas tree - photo

How to sew a Christmas tree from scraps of fabric

Unusual Christmas tree made from plastic spoons

Gift idea: Christmas tree made of candies and tinsel

Christmas tree made of beads - a beautiful craft

Decor of a champagne bottle in the form of a festive tree

Christmas tree made of satin ribbons for the New Year

Flat Christmas trees made of twine and lace

Bright Christmas trees made of multi-colored balls

Homemade Christmas tree made from wrapping paper

DIY fluffy Christmas trees made from yarn

Small Christmas trees made of fabric and buttons

Christmas tree crafts from natural material: cones and feathers

Simple Christmas trees made of yarn, beads and buttons

Transparent Christmas trees made of Christmas balls suspended in the air

DIY wine cork tree

Funny Christmas trees made of twine and ribbons

A simple children's craft - a paper Christmas tree

Crooked sisal Christmas trees