Quite often, during a presentation with a report or report, a presentation of a new program or product, it becomes necessary to visualize some information in front of the public. The most popular program for this is Microsoft PowerPoint 2007 - an environment for creating presentations with various effects. Now almost no event, such as a seminar, conference, diploma defense, is complete without graphic support created in Power point... Advances in technology have made it possible to reproduce presentations not only on a computer screen or TV, but also on interactive whiteboards and using projectors.
Power Point Review
Making a presentation on a computer isn't the only feature in Microsoft Power Point. With this program it is possible:
- wow the audience with an informative presentation;
- create graphic support for the target flow of people;
- scale slides by increasing or decreasing the desired areas;
- quickly switch slides, both in automatic and manual mode;
- to arrange a unique graphic support for the report;
- use both your own themes and design developed by the program manufacturer;
- quickly and easily create the desired charts, graphs, etc.
- add various visual and sound effects.
Video: business presentation
Presentation components
The presentation consists of slides, the number of which is practically unlimited. They are sequentially collected into one file with the ".ppt" extension, which opens on any computer where Microsoft program Power Point.
Slides can be shown from electronic media, or can be printed on paper.
Anything you need for demonstration can be placed on the slides:
- text information;
- photographs, pictures, drawings, etc .;
- tables, graphs, diagrams;
- videos, films, clips;
- audio files;
- other graphic objects.
Power Point slides can be customized and modified:
- the size;
- markup (location of objects on it);
- template (layout and design);
- visual and sound transition effects.
The initial editor window in the program looks like this:

The Menu bar contains all the important commands of the program, and the toolbar contains the main and frequently used options. This panel can be edited by adding or removing specific elements. By clicking on the "Create Slide" button, an empty template will appear on the screen, on which you have to work.
The left pane displays all the slides that make up the presentation. They can be in the form of their miniature copies, or they can be displayed in structured text, displaying titles or slide content. Also in this panel, you can move and change the position of the slides. The task pane (located on the right) will display actions that you can use in the process of creating an impression. At the bottom of the screen there is a Notes area, where you can enter all comments on the slide you are creating, which are visible only while working on the presentation.
All areas on the working screen can be enlarged or reduced by placing the cursor on their end line.
How to make your presentation step by step
There are several ways to create a presentation for an interactive whiteboard:
- develop a completely new presentation;
- from a standard or previously made template;
- from a ready-made file;
- from the Auto Content Wizard.
If you look in more detail, then in the new demo you need to independently make all the markup, design styles, fonts, etc. Rework finished presentation will not end up with a unique product. The choice of a template is similar to the previous method and allows you to use ready-made graphic and design developments from the creators of the program. If you use the "Auto Content" wizard, the program will ask you questions and, based on the answers, will create the template you want presentation.
Start of creation
To start creating a slide show, you need to open the desired program.
This can be done via:
- Start;
- Programs;
- Microsoft Office;
- Microsoft Office PowerPoint 2007.
A working window will appear in the open program, in which you must select one of the previously listed methods of creating a slide show.
Video: Power Point Presentation 2007
We do it according to the template
You can create a beautiful presentation with a wide variety of Power Point templates. They include ready-made, in terms of design, slides where you need to enter data. The design of the templates took into account:
- Background color;
- Slide color schemes;
- Fonts, etc.
You can create a slide show from a template through the menu:
- File;
- Create;
- Create a presentation;
- Templates.

Select the desired template and click "Create". A slide of the selected style appears in the work area, which you can edit.

Loading slides
To create a new slide, click on the corresponding button on the toolbar. You can also do this by right-clicking on the slide thumbnail in the window on the left by selecting the same command.
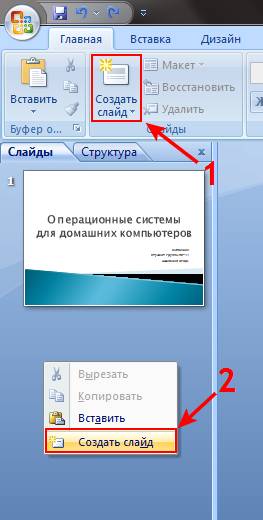
In the presentation structure area, you can copy or delete slides by selecting them and pressing the corresponding keyboard buttons. Or through the menu that opens with the right mouse button when you click on a slide.
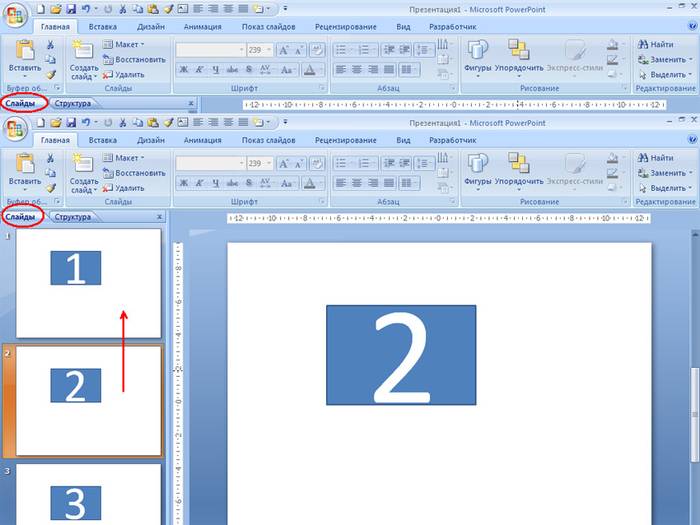
Also, slides can be swapped:
Change markup finished slide possibly through:
- Home;
- Layout.

Text is entered in special fields on the slide. When marking up a slide, the place for the text is already allocated automatically, but you can also add it to other places through the control panel item "Insert-Text". In the field that appears, enter text.

The size of the input box will expand as you add text. You can finish typing by clicking on any free area on the slide.
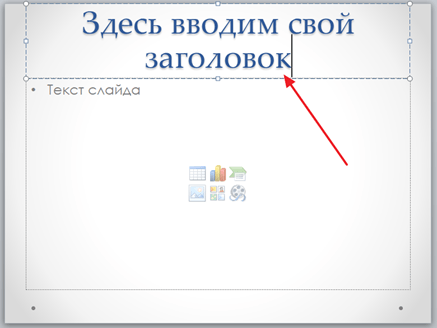
You can insert a picture or your own picture using the command:
- Insert;
- Drawing.

Or by clicking on the picture in the slide layout itself:

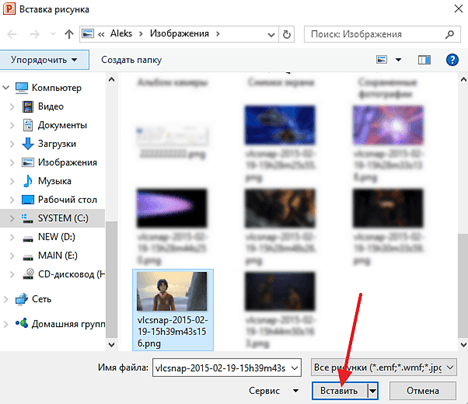
In the window that opens, select the desired file location and the picture itself, and then click the "Insert" button. If you select "Clip", you will be prompted to find an image among the standard images of the program.

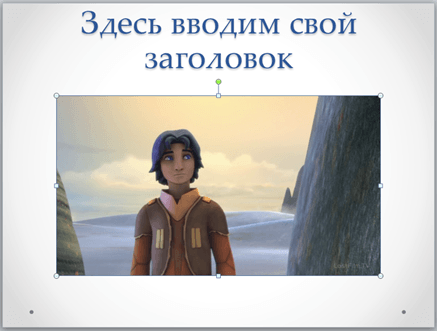
Any field on a slide can be moved and resized.

To do this, you should:
- click once on the desired object:
- then hover the cursor over its borders - the change option will be available.
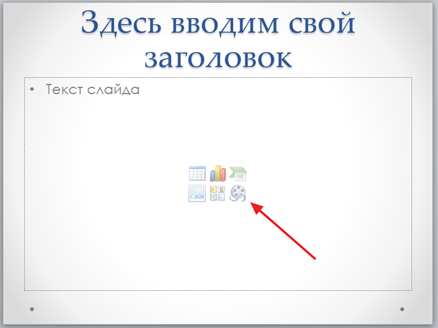
It is possible to add sound, video, tables, graphs, diagrams and autoshapes to a slide. Their buttons are in the work area of the slide and in the "Insert" menu. There are quite a few options for each object, and the accessible design of Microsoft Power Point makes it possible to quickly understand them.
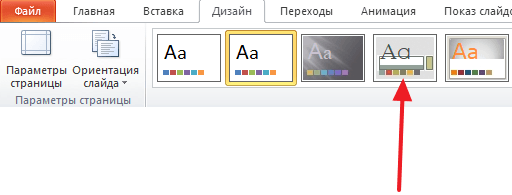
New design
You can change the design of the site through the menu:
- Design;
- Themes.

It has subsections:
- Colors;
- Fonts;
- Effects.
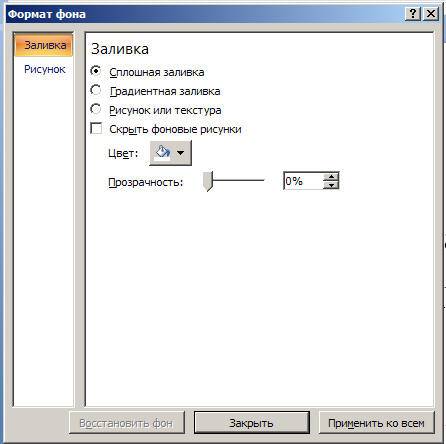
You can apply the selected theme, both to the entire show, and to a separate slide... The color scheme within a specific theme can also change. To do this, click on the appropriate column in the design area. Select a diagram and right-click on it, applying it either to the entire presentation or to the selected slide: You can make your own image or fill as the background:
- Design;
- Background styles;
- Background format.

In this window, you can select the type of fill:
- Solid;
- Gradient (smooth transition from one color to another);
- Pattern or texture.
Text formatting - important stage in creating a slide show. A lot depends on the readability of the test.
For editing you should:
- select the desired piece of text;
- then use the tools on the main taskbar.
By default, each new line in the text is treated as a bulleted list. This is changed through the toolbar. Also Power Point contains buttons for setting special effects, text direction, changing line spacing, etc. When a graphic image is selected in the work area of a slide, the "Working with pictures" tab will appear on the toolbar.
There you can change:
- Brightness;
- Contrast;
- Display style;
- Colour;
- The size.
Video: Presentation in 10 minutes
Animation
It is desirable to give beautiful visualization to slides filled with information. This is done using the Animation Effects in the Slide Design task pane. From a large list of effects, you can choose any for each object on the slide. Then, during the demonstration, they will appear beautifully on the screen. One effect is applied to one slide, but you can click Apply to All Slides and it will appear on all slides in your presentation.

You can also set up animation for each object on the slide:
- select it and right-click and select Animation Settings;
- or go to the menu item "Animation" - "Animation settings".

Then a panel will appear on the right side where you can add a separate effect to each object, as well as adjust its speed, soundtrack and appearance time.

Adding transitions
The transition is used when changing from one site to another. A new slide can appear immediately or gradually. The gradual appearance makes the presentation more beautiful and interesting.
To set up a transition, you need to select a slide and go to:
- Animation;
- Animation setting:
- Next, you should choose the transition effect you like, the sound to it and the speed of the process. Also, an automatic transition is configured (then its time is set) and by mouse click. The transition can be made for each slide separately, or you can configure it for the entire presentation at once.
Completion
At the end of the presentation, you should adjust the parameters of the slide show itself in order to avoid unpleasant moments during the presentation. This is done in the "Slide Show" - "Demonstration Setting" section:

All the main display parameters are set here:
- Slide management;
- Change of slides;
- Slide numbers.
You can also hide slides that are temporarily unnecessary for showing but cannot be deleted from the Slide Show menu.
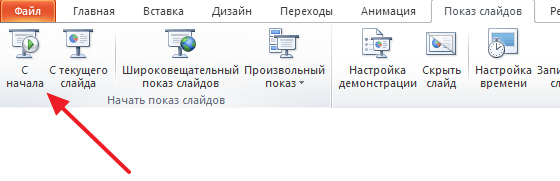
You can view the finished work by clicking on the "From the beginning" button:
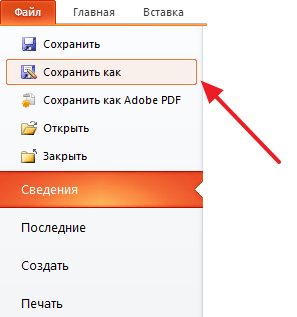
- Save as…;
- Choose a save location;
- Write the title of the work;
- Save.
Microsoft Power Point- affordable and simple program to create presentations on a computer. A variety of visual effects and themes will allow you to quickly create an original and unique presentation for your public speaking or school assignment.
>It has long been no secret that a person perceives information better in the form of images than in the form of solid text. Therefore, today, in order to present your idea or product, it is worth using not only the speech written the day before, but also visualization. That is, graphs, abstracts, pictures, diagrams, calculations, infographics, etc. All this will allow listeners not only to listen to the information, but also to delve deeper into it. What is needed for this?
A well-known program that everyone will find in their Microsoft Office package will be useful to many. We're talking about PowerPoint. Surely at school you went through the creation of presentations in this program. But who used it outside of the classroom? And in vain. Now we will give a few practical advice how to make presentations in this application.
PowerPoint and its capabilities
The first step is to think about what you yourself want from the presentation. What it will be about, in what order the information will be presented. Decide what is useful for you - tables, graphs, lists, pictures. If you have a plan and a clear vision of the final work in advance, it will be easier for you. Remember that there should be as little solid text as possible, then the information will be better absorbed. Break it down into lists, abstracts, select thematic photos or images. What are the parts of your speech?
- Structure and content of speech
- Slide design
- Submission of information
And success depends on each of these parts. The software gives you great opportunities for the original and interesting design material. But first, it must be structured. And then you will be interested in presenting your presentation to the audience. And if you do not cope well with this task, then the beauty and design style may not play a special role. Now let's take a look at how to make a PowerPoint presentation.
First you need to open the program. Then "Create slide" by clicking in the upper right corner of the control panel and choosing its layout. At the same time, try not to place several blocks of visual or text information at once on one slide, this will seriously complicate its perception and memorization.
There are also templates in the program. There you can choose exactly the one that will be appropriate in your case. But to use it, you need to create a new presentation and first select a template. To do this, go to the File menu, select New, and in the templates menu that appears, select the required one.
The presentation should be bright and memorable. This requires not only graphics and pictures, but also the appropriate color design for the slides. And PowerPoint has a lot to choose from. Themes can be found in the Design tab, in the Themes group. To apply it to the slides, select the ones you want, and then right-click on the theme and select “Apply to Selected Slides”. In the theme, you can change the color palette, effects, or choose a suitable background style. Make sure the text contrasts with the background and is legible. Try to stick to the same color palette, then the whole presentation will look uniform. And avoid too colorful design. The ideal ratio is using up to 4 colors on one slide. It is important to know not only how to make a presentation, but also how to get the audience interested.
Working with text, in particular with fonts, in PowerPoint is no different from working in Word. You can choose the font style, size, color. Remember that this tool is suitable for highlighting semantic accents. More important information you can highlight in large print, tone, underline or bold, set the order of appearance of words on the screen.
The slide must be readable. The ideal size for a headline is 22-28 size, for captions and subheadings you should choose 20-24, and the rest of the text - within 18-22 sizes.
There are many unusual and beautiful fonts in the list, but always think about how it will read. The listener should think about the meaning of the text, and not about the ornateness of the letters. And don't overload one slide with too many words.
Use italics for secondary information, and underline and bold for main information. Don't play with the types of fonts in your slides. Pick one, it will improve the perception. Arial, Times New Roman, Calibri, Tahoma, Verdana, Bookman Old Style are best suited for comfortable reading.
As we already wrote, dilute the text with visual information - graphs, tables, infographics, photographs and pictures, diagrams. The part can be found by clicking on the "Insert" tab and then going to the "Illustrations" group. A photo or drawing can be added with the already known combination of copy / paste commands.
Place illustrations on separate slides, and not on those already occupied by the text. This will improve their perception. Do not forget that the added picture or photo must be High Quality otherwise, during stretching, they may lose sharpness and spoil the whole impression.
In addition to visual information, the presentation can be equipped with musical accompaniment... If appropriate in your case. To do this, go to the chain Insert - Multimedia Clips - Sound. Then select "Sound from file", specify the folder with the music and the type of music files. You can also set the playback order: automatically or by mouse click. This can be done in the tab "Working with sound" - "Sound parameters". Try not to overdo it with the music and choose an unobtrusive, calm composition that will not distract from the presentation itself.
You can animate objects on slides by adding effects. Then phrases, graphics or pictures will effectively appear on the screen in the sequence you choose. For this, the chain "Animation" - "Animation settings" is suitable, and then the choice of an object for one or another effect. In the animation settings go to "Select effect". There is also a field "Change effect", where you can customize the animation: its speed, direction, time of appearance. But moderation is also important here. Otherwise, the attention of the audience will shift from the essence of the presentation to the movement and sparkling of the animation.
You can also diversify the change of slides. To do this, there are different options for transition effects. In the "Animation" tab, select a slide and the "Transition to the next slide" group, there specify one or another type of transition. You can also change the speed of the transition there, and in the "Change Slide" - the order. That is, the slide will change automatically or on command. You can add sound: "Animation" - "Transition to the next slide" - "Transition sound". To add a sound that is not in the list, you should select "Other sound" and specify the desired file.
A few more tips on how to make a slide presentation for a good audience:
- Don't add too many sounds
- Choose a slide-to-slide transition on click, it's convenient
- For yourself, make notes in your speech when you need to switch this or that slide
- Just in case, make a copy of the speech with notes for the technician who will be managing the presentation of the presentation.
The presentation is ready. You can view the result by clicking on the "Slide Show" button in the lower right corner of the screen. If you need to change something else, press Esc and make adjustments. Then save the finished one. Now you know how to make presentations. Good luck!
Presentation is great way to make your report more understandable and interesting to the public. Presently, presentations are created mainly in PowerPoint, which comes with Microsoft's office software suite. In this article, you can read a small step by step instructions to create presentations in Microsoft PowerPoint. The article will be relevant for PowerPoint 2007, 2010, 2013 and 2016.
Step 1. Launch PowerPoint.
To start creating a presentation, you just need to launch PowerPoint. This can be done using a shortcut on the desktop.
If you don't have a PowerPoint shortcut on your desktop, you can start this program by searching in the Start menu. To do this, open the Start menu and search for “PowerPoint”.
Step number 2. Choosing a design future presentation.
After PowerPoint is launched, you can immediately start creating your presentation. It is best to start with design by going to the Design tab. On this tab, you will see a large list of ready-made presentation designs. Choose one of the available options.
To the right of the list of ready-made designs, there are buttons for Colors, Fonts, Effects, and Background Styles. With the help of these buttons you can adapt the selected design to your requirements. You can change the color and font of the text, the background color of the presentation, and add additional effects.

If ready-made designs are not enough for you, then you can search the Internet for other templates for PowerPoint presentations.
Step number 3. Create slides.
After choosing a design, you can start creating slides for your future presentation. This is done using the "Create Slide" button, which is located on the "Home" tab. Click on the down arrow below the New Slide button to open a menu with available slides.

In the menu that opens, you will see several types of slides. These are Title Slide, Title and Object slide, Section Title slide, Two Objects slide, and so on. Select the type of slide that suits you and click on it with the mouse. For this example, we'll create a Title and Object slide. This will result in a new slide with a title at the top of the slide and an empty margin at the bottom.
Step number 4. Filling in the created slides.
After creating a slide, you can fill it with information. To begin with, you can change the title of the slide, for this we double-click on the inscription "Slide Title" and enter another text.
After the title is entered, you can fill in the blank field below the title. If there should be text under the heading, then just click on the empty field and enter the desired text.

If there should be some other information under the heading, for example, a video or a picture, then for this you need to use the buttons in the middle of this field. There are six buttons available for inserting tables, charts, SmartArt graphics, photos, PowerPoint clip art, and videos.
When creating presentations in PowerPoint, photographs are most often inserted, so we will consider this particular option. In order to insert a photo from a file, you need to click on the button with the image of the photo. After that, a window for selecting a photo will appear. Select the desired photo and click on the "Insert" button.
After that, your chosen photo will appear under the slide title.
In this way, you have created a PowerPoint presentation from one slide. In order to add another slide, return to the "Home" tab, click on the "New Slide" button again and add another slide to the presentation. After that, you can fill in one more slide with information. Repeat this procedure until your presentation is complete.
Step # 5. Preview your presentation.
In order to evaluate the created presentation, go to the "Slide Show" tab and click on the "From the beginning" button there. After that, the presentation will open in full screen, and you can see how it will look in finished form.
You can also click the From Current Slide button. In this case, the presentation will not start playing from the beginning, but from the frame where you stopped while working with the presentation.
Step number 6. Saving the presentation.
After the presentation is created, you need to save it. To do this, open the "File" menu and select the "Save As" option.
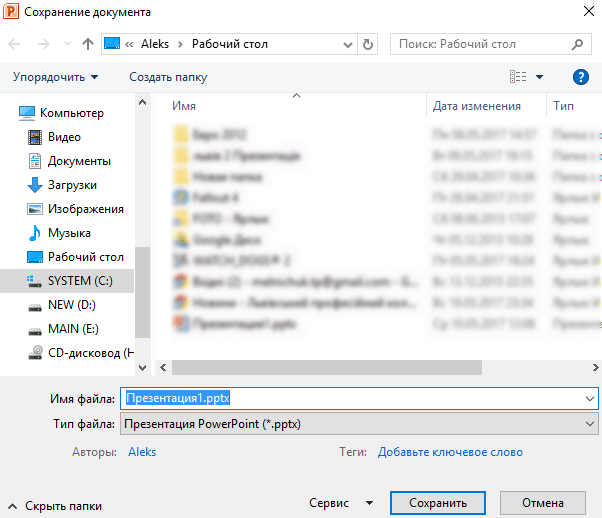
As a result, a window for saving the file will open. In this window, you need to select a folder and click on the "Save" button. This way you will get the file PowerPoint presentations in PPTX format, which you can then open and continue creating a presentation.
If your presentation is already ready for display, then it must be additionally saved in a different format. To do this, use the "File - Save As" menu in the same way, but before saving, change the format to "PowerPoint Demo".
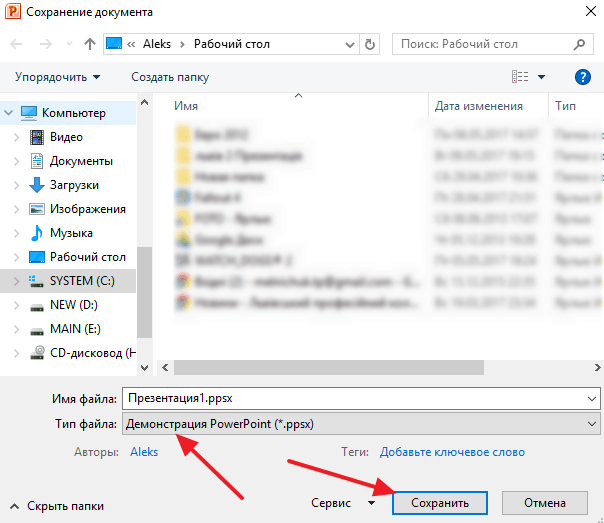
After saving this way, you will receive a file in PPSX format. The advantage of this format is that the presentation starts playing as soon as it is opened, and the PowerPoint interface does not even appear. But, files in the PPSX format cannot be edited, so the presentation must be saved in both PPTX and PPSX format.
An insightful article of 20 tips for creating presentations for non-designers: from choosing a background color to meaning last slide... Yevgenia Kryukova, a marketer of the Texterra agency, figured out this difficult matter, creating presentations, and shared her thoughts with everyone who constantly needs to create presentations.
Initially, I wanted to write a large and very detailed guide on how to conduct webinars, but when I began to delve into the topic, I realized that the material is so large that readers simply cannot master it. Therefore, I decided to divide it into separate articles in order to give the most complete and useful information, and so that, dear readers, it is convenient to consume this information. Today's article will focus on how to create high-quality and beautiful presentations, even if you don't have design skills. So let's go.
What should be the design of your presentation
Before moving on to specific tips, I would like to make a small digression. I’m not a designer, I don’t know how to draw at all, and all my skills in Photoshop are reduced to performing commonplace basic actions. Despite this, I love and know how to create simple, but pretty cute presentations.
What am I doing this for?
If there are people among your readers who think they cannot create a beautiful and effective presentation because they lack the talent for drawing and proper design skills, read the following lines carefully.
Anyone can learn modern web design. Moreover, for this you do not need to study tons of professional literature or attend expensive courses. It is enough to memorize the basic rules and stock up on a large number of successful examples, looking at which you will draw inspiration. Yes, thanks to these actions professional designer maybe you won't, but you can easily create stylish pictures and presentations.
So what are the rules to follow to make your presentation trendy and effective?
1. Discard ready-made templates
They are soulless, dull, and everyone is already wildly tired of them. Better create something of your own. Moreover, now it is not necessary to have design skills for this. There are a large number of programs and services that will do all the work for you (one of these services) will be discussed at the very end of the article.
Not right: One of the standard Power Point templates
Right: Own design (very simple yet stylish)
2. Use a good color combination
One of the most common mistakes people who are unfamiliar with modern web design trends make is that they choose an extremely unfortunate combination of colors: brown, dark blue, burgundy, mustard. If you use these colors with each other, and even with a poorly chosen font, you get the impression that the image came to us from the 90s. These colors are not used in web design these days. More precisely, they are used, but in combination with other, more pleasant and "pure" shades (the so-called flat colors).
Not right: Poor choice of colors
Right: Flat colors - beautiful and modern
If what I said above is not entirely clear to you, and you still don’t know which colors to choose, use flatcolors.net. There are ready-made palettes with very trendy and juicy combinations. To copy the code of the color you like, just left-click on it.
 Click on the color you like, and its code will be automatically copied to the clipboard
Another way to find a good palette is to find a picture that you like and decompose it into colors using the Adobe Kuler service. To do this, follow the link I indicated, click on the icon with the camera and upload the image you like.
 Adobe Kuler service
In my opinion, this method is best suited for color-coded landing pages or some simple images from design communities (like behance.net), because usually few colors are used on them and they all blend very well with each other. But in general it can be used to lay out any images.

I uploaded a landing page and got the colors that are used on this landing
As soon as the service has issued a ready-made palette, you need to copy the code for each of the colors. To do this, use the free Colorzilla plugin. This is done as follows:
- Install the Colorzilla plugin in Google chrome or Mozilla Firefox.
- Click on the eyedropper in the upper right corner of your browser.
- Select the Page Color Picker Active command.
 Colorzilla Plugin
- Click on the desired color to copy its code in HEX format to the clipboard (format code # ed3434 - hash and 6 characters).
 Find out the code of the selected color
- If you need the code in RGB or HSL format, click on the eyedropper, click Copy to Clipboard and select the format you need.
 Choosing a suitable code format
- Paste the code into the program you are working in.
- Ready!
3. Use no more than 5 colors throughout your presentation.
Don't turn your presentation into a rainbow, even if your talk is about a children's topic. The large number of colors interferes with reading and making sense of the slides. It is best to use no more than 2-3 colors on one slide, taking into account the main background color. In the entire presentation - no more than five.
Not right: Why are there so many flowers?
Right: 3 colors on a slide - the norm
4. Observe the contrast of text and background
Everything is simple here: if the background is dark, use a light font. If light, then dark. The text should be clearly readable on your slide, otherwise your audience will be uncomfortable, and instead of listening to you, they will spend their attention trying to make out what you have written there.
Not right: Poor contrast
Right: Good contrast
5. Discard shadows, gradients and other old-fashioned effects
Try to keep up with the times and design your slides so that they don't feel like a relic of the past. After all, the level of trust of the audience to you as a specialist will depend on how well you arrange your presentation. Good specialist always developing and following new trends. Bad - does not want to perceive anything new and believes that he has already fully taken place. Do you agree? Then strive for minimalism.
Not right: Don't do that
Right: But here everything is okay: nice color and nothing superfluous
6. Avoid low-quality stock images
Not right: The stock image that I found for "team"
Right: If you really need a team photo, then let it be like this
How to distinguish a low-quality stock image from a high-quality one?
Low-quality stock images have certain characteristics. They:
- are used on every second site;

We bet you've already seen a guy somewhere drawing with a marker on glass?

Or people shaking hands tightly?
- contain low-quality graphics (usually on a white background);

Oh, these little white men ...
- depict artificial situations and artificially smiling people.
 I never thought office work was so much fun
Well, and for dessert - some great pictures, making fun of all the absurdity of staged stock photos, so that you finally understand how to recognize them:
 He jokes and jokes all the time ...
 Indeed, why?
 It's even more interesting with the device turned off!
7. Use modern fonts
Calibri, Comic Sans, Times New Roman - these fonts can be used, but I would not recommend you to do this, because they are rather boring and do not have the desired effect on the audience. Instead, opt for more modern fonts. For example Helvetica, Open Sans or Roboto. These fonts are fairly basic, but suitable for almost any project.
Not right: Not the best choice for your presentation
Right: Helvetica, Roboto, Open Sans - take it, you won't go wrong
Where can I find good fonts?
My favorite place to find and download the fonts I need is the Vkontakte group. Free fonts". There is a search and a rather handy menu. Next to each font is information about whether it can be used commercially or not. For example, the font in the screenshot below is completely free, as indicated by the inscription in parentheses - free font.
 One of the posts in the "Free Fonts" group
I also highly recommend paying attention to the monthly collections of the site site - "". It's just a treasure trove of cool Cyrillic fonts! Each font can be downloaded with one click directly from the article. True, the type of license will have to be clarified independently, it is not indicated in the article.
8. The font must be readable
When choosing a font, be sure to pay attention to how readable it is. Fancy, ornate serif fonts look interesting, but sometimes they are so difficult to read that it is better to abandon them altogether.
Not right: The font is difficult to read
Right: The font is easy to read
9. Use no more than 3 fonts on one slide
There should be no more than three fonts in the entire presentation: the heading font, the body text font, and the frame font (if necessary). If you use more fonts, your slide will look sloppy and frivolous.
Not right: 5 fonts per page is overkill
Right: One font for headings, one for body text, and one for sidebars. Everything is correct here
Quite often, during a presentation with a report or report, a presentation of a new program or product, it becomes necessary to visualize some information in front of the public. The most popular program for this is Microsoft PowerPoint 2007 - an environment for creating presentations with various effects. Now almost no event, such as a seminar, conference, or diploma defense, is complete without graphic support created in Power Point. Advances in technology have made it possible to reproduce presentations not only on a computer screen or TV, but also on interactive whiteboards and using projectors.
Power Point Review
Making a presentation on a computer isn't the only feature in Microsoft Power Point. With this program it is possible:
- wow the audience with an informative presentation;
- create graphic support for the target flow of people;
- scale slides by increasing or decreasing the desired areas;
- quickly switch slides, both in automatic and manual mode;
- to arrange a unique graphic support for the report;
- use both your own themes and design developed by the program manufacturer;
- quickly and easily create the desired charts, graphs, etc.
- add various visual and sound effects.
Video: business presentation
Presentation components
The presentation consists of slides, the number of which is practically unlimited. They are sequentially collected into one file with the extension ".ppt", which opens on any computer where Microsoft Power Point is installed.
Slides can be shown from electronic media, or can be printed on paper.
Anything you need for demonstration can be placed on the slides:
- text information;
- photographs, pictures, drawings, etc .;
- tables, graphs, diagrams;
- videos, films, clips;
- audio files;
- other graphic objects.
Power Point slides can be customized and modified:
- the size;
- markup (location of objects on it);
- template (layout and design);
- visual and sound transition effects.
The initial editor window in the program looks like this:

The Menu bar contains all the important commands of the program, and the toolbar contains the main and frequently used options. This panel can be edited by adding or removing specific elements. By clicking on the "Create Slide" button, an empty template will appear on the screen, on which you have to work.
The left pane displays all the slides that make up the presentation. They can be in the form of their miniature copies, or they can be displayed in structured text, displaying titles or slide content. Also in this panel, you can move and change the position of the slides. The task pane (located on the right) will display actions that you can use in the process of creating an impression. At the bottom of the screen there is a Notes area, where you can enter all comments on the slide you are creating, which are visible only while working on the presentation.
All areas on the working screen can be enlarged or reduced by placing the cursor on their end line.
How to make your presentation step by step
There are several ways to create a presentation for an interactive whiteboard:
- develop a completely new presentation;
- from a standard or previously made template;
- from a ready-made file;
- from the Auto Content Wizard.
If you look in more detail, then in the new demo you need to independently make all the markup, design styles, fonts, etc. Redoing the finished presentation will not ultimately result in a unique product. The choice of a template is similar to the previous method and allows you to use ready-made graphic and design developments from the creators of the program. If you use the "Auto Content" wizard, the program will ask you questions and, based on the answers, will create the required presentation template.
Start of creation
To start creating a slide show, you need to open the desired program.
This can be done via:
- Start;
- Programs;
- Microsoft Office;
- Microsoft Office PowerPoint 2007.
A working window will appear in the open program, in which you must select one of the previously listed methods of creating a slide show.
Video: Power Point Presentation 2007
We do it according to the template
You can create a beautiful presentation with a wide variety of Power Point templates. They include ready-made, in terms of design, slides where you need to enter data. The design of the templates took into account:
- Background color;
- Slide color schemes;
- Fonts, etc.
You can create a slide show from a template through the menu:
- File;
- Create;
- Create a presentation;
- Templates.

Select the desired template and click "Create". A slide of the selected style appears in the work area, which you can edit.

Loading slides
To create a new slide, click on the corresponding button on the toolbar. You can also do this by right-clicking on the slide thumbnail in the window on the left by selecting the same command.

In the presentation structure area, you can copy or delete slides by selecting them and pressing the corresponding keyboard buttons. Or through the menu that opens with the right mouse button when you click on a slide.
Also, slides can be swapped:

You can change the markup of the finished slide through:
- Home;
- Layout.

Text is entered in special fields on the slide. When marking up a slide, the place for the text is already allocated automatically, but you can also add it to other places through the control panel item "Insert-Text". In the field that appears, enter text.

The size of the input box will expand as you add text. You can finish typing by clicking on any free area on the slide.
You can insert a picture or your own picture using the command:
- Insert;
- Drawing.

Or by clicking on the picture in the slide layout itself:

In the window that opens, select the desired file location and the picture itself, and then click the "Insert" button. If you select "Clip", you will be prompted to find an image among the standard images of the program.

Any field on a slide can be moved and resized.

To do this, you should:
- click once on the desired object:
- then hover the cursor over its borders - the change option will be available.
It is possible to add sound, video, tables, graphs, diagrams and autoshapes to a slide. Their buttons are in the work area of the slide and in the "Insert" menu. There are quite a few options for each object, and the accessible design of Microsoft Power Point makes it possible to quickly understand them.
New design
You can change the design of the site through the menu:
- Design;
- Themes.

It has subsections:
- Colors;
- Fonts;
- Effects.
You can apply the selected theme, both to the entire show, and to an individual slide. The color scheme within a specific theme can also change. To do this, click on the appropriate column in the design area. Select a diagram and right-click on it, applying it either to the entire presentation or to the selected slide: You can make your own image or fill as the background:
- Design;
- Background styles;
- Background format.

In this window, you can select the type of fill:
- Solid;
- Gradient (smooth transition from one color to another);
- Pattern or texture.

Formatting your text is an important step in creating your slide show. A lot depends on the readability of the test.
For editing you should:
- select the desired piece of text;
- then use the tools on the main taskbar.
By default, each new line in the text is treated as a bulleted list. This is changed through the toolbar. Also Power Point contains buttons for setting special effects, text direction, changing line spacing, etc. When a graphic image is selected in the work area of a slide, the "Working with pictures" tab will appear on the toolbar.
There you can change:
- Brightness;
- Contrast;
- Display style;
- Colour;
- The size.
Video: Presentation in 10 minutes
Animation
It is desirable to give beautiful visualization to slides filled with information. This is done using the Animation Effects in the Slide Design task pane. From a large list of effects, you can choose any for each object on the slide. Then, during the demonstration, they will appear beautifully on the screen. One effect is applied to one slide, but you can click Apply to All Slides and it will appear on all slides in your presentation.

Adding transitions
The transition is used when changing from one site to another. A new slide can appear immediately or gradually. The gradual appearance makes the presentation more beautiful and interesting.
To set up a transition, you need to select a slide and go to:
- Animation;
- Next, you should choose the transition effect you like, the sound to it and the speed of the process. Also, an automatic transition is configured (then its time is set) and by mouse click. The transition can be made for each slide separately, or you can configure it for the entire presentation at once.
Completion
At the end of the presentation, you should adjust the parameters of the slide show itself in order to avoid unpleasant moments during the presentation. This is done in the "Slide Show" - "Demonstration Setting" section:

All the main display parameters are set here:
- Slide management;
- Change of slides;
- Slide numbers.
You can also hide slides that are temporarily unnecessary for showing but cannot be deleted from the Slide Show menu.
You can view the finished work by clicking on the "From the beginning" button:
- Save as…;
- Choose a save location;
- Write the title of the work;
- Save.
Microsoft Power Point- an affordable and simple program for creating presentations on a computer. A variety of visual effects and themes will allow you to quickly create an original and unique presentation for your public speaking or school assignment.


