It is necessary to finalize the RMK in 1c: Retail with minimal interference in the configuration and with maximum ergonomics.
Description of software and structure:
Configuration: 1c:Retail 2.2 (2.2.7.39)
Compatibility Mode: Version 8.3.10
Platform: 1C:Enterprise 8.3 (8.3.11.2924).
RIB for 15 kiosks (shops) and one central base
Kiosks do not have a full keyboard (numeric keypad and mouse only)
Tasks:
1. When you click on the “Collection” button, the user will display a form with the buttons “Collection”, “Salary”, “Other purposes”.
Then the result of pressing the button is recorded in the “comment” field of the generated notch.
2. Add an “Order” button to the RMK. By clicking on the order button, a form with the assortment will be displayed (according to assortment matrix) and automatically calculated recommended quantities, as well as a separate column “To order”, in which the user himself indicates what quantity to order. Next, you need to request confirmation from the user about the order, displaying non-zero items “to order” and, after confirmation, create orders (either to the supplier or for movement - each item has its own source of collateral).
2.1. Rules:
a) automatic calculation of the need to form from:
- sales statistics adjusted for days with zero stock balance
- balance of goods in warehouse
b) Prices for ordering should be taken from the latest receipt
c) The source of order security must be obtained from the last source (if the goods arrived earlier by transfer, then the order must be formed for transfer)
d) When re-creating an order, previously unsecured orders must be taken into account and displayed to the user.
Additional requirements:
1. All of the above must be done so that when changes are made to the calculation algorithms, there is no need to update each database separately (the initial implementation is not taken into account). Note: As far as I know, the compatibility mode used does not support extensions.
2. All of the above must be done so that the interface and operating principle are as clear as possible to a user who is little familiar with 1C.
The first step in setting up the 1C: Retail 2.2 program will be to create Organizations. To do this, go to point Regulatory Reference Information (RNI), in the navigation panel select Organization details.
In the window that opens, select Entity or Individual entrepreneur. After this, fill in the appropriate details: Name in the program, Abbreviated name, Full name, TIN and others. 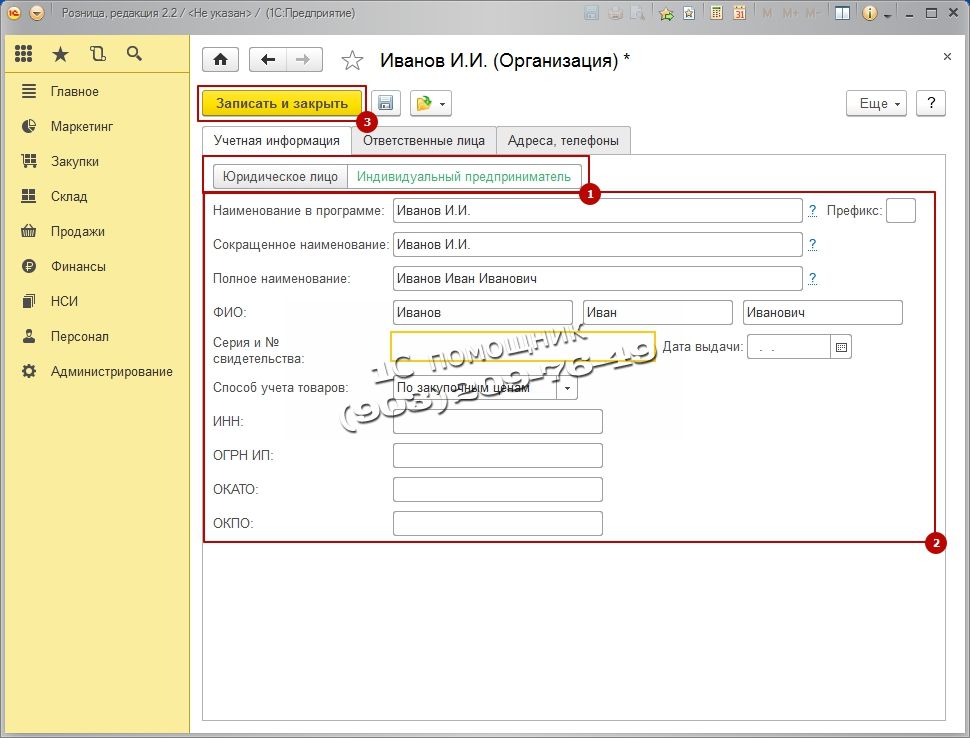
The next step is to create Types of prices. Go to the section Marketing, in the navigation panel select Types of prices and press the key Create.
We will need to create two types of prices: Purchasing And Retail.
First let's create Purchasing To do this, fill in the window that opens: Name, Method of setting the price and Data layout scheme. Purchasing the price will be filled in from the goods receipt document. 
After adding Purchase price need to be added Retail price, that is, the price at which we will sell. Fill in the new price: Name, Use when selling, Method of setting price and Calculation rules. In this case, we will receive an automatic price calculation, that is, Product Receipt Price + 50% markup = Retail Price. In the future, you can change the price manually. 
The next step is to create Pricing Rules, come in Marketing Pricing Rules and press Create.
In the window that opens, fill in Name And Type of prices.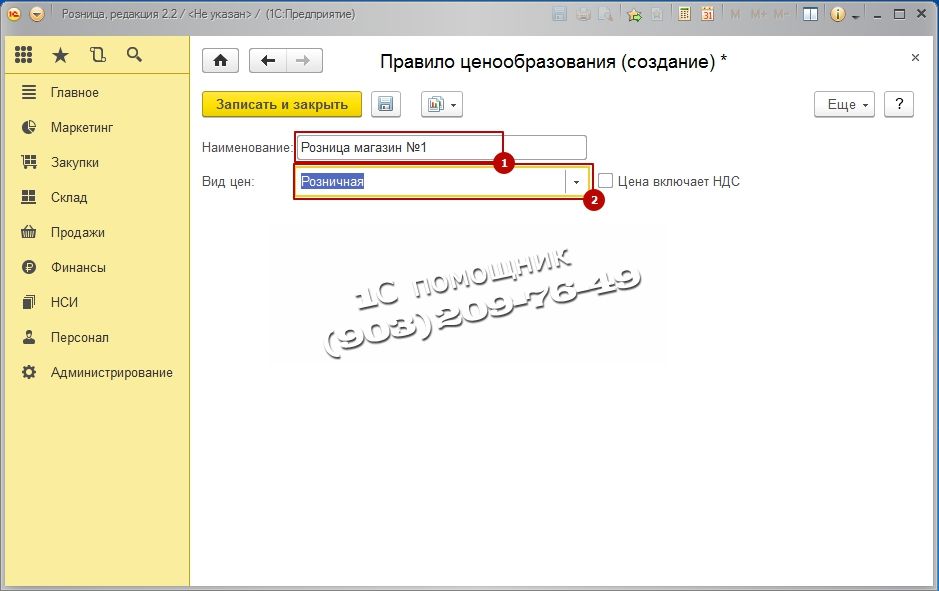
Program 1C: Retail requires creation to work Store who will release the goods. Let's go to Regulatory Reference Information (RSI), in the navigation panel select The shops and press Create. 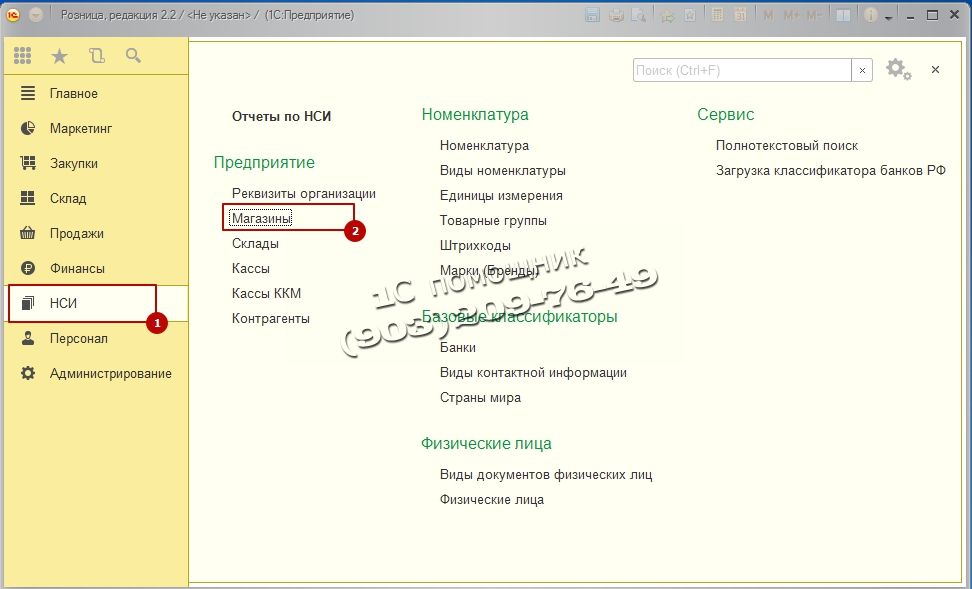
In the window that opens, fill in the basic details: Name, In the shop here you need to choose either to work with one warehouse or with several, Warehouse name, Sales organization this is the organization with which sales will be made, Pricing Rule, Type of minimum selling prices this is the same purchase price, it will be impossible to sell below this price, so as not to work at a loss, The procedure for rounding the check amount This item will allow you to round up the amount of the check, so as not to bother with pennies, if you think that you will already have equal prices and this is not required, then you are mistaken, because when applying discounts, pennies will still appear in the item Rounding type choose Round the total This item will allow you to lose less money on rounding. After filling in all the details, click the button Save and close.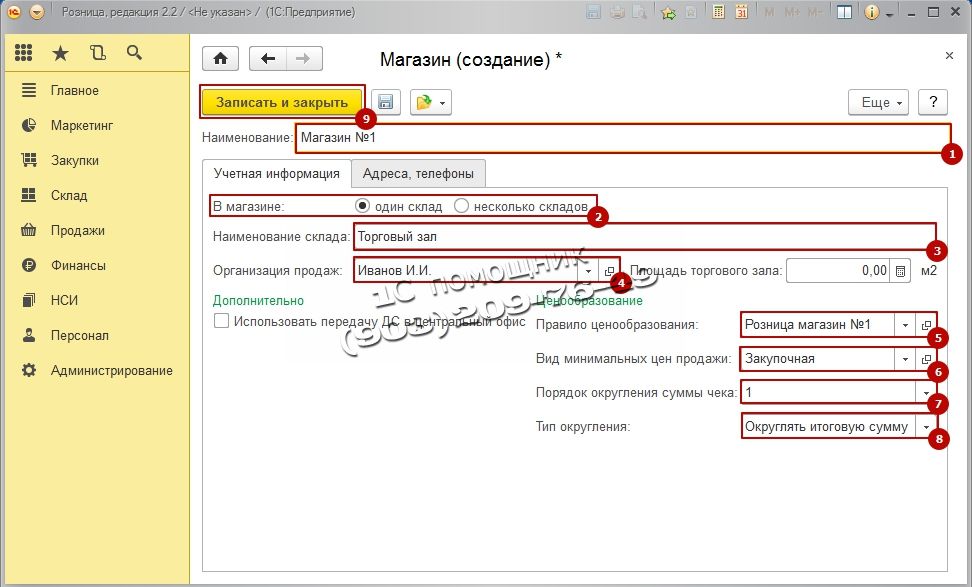
RMK (Cashier Workplace) cannot function without a Fiscal Registrar, so the next step is to add a fiscal registrar to the system. In our case we will add emulation of a fiscal registrar. Go to the section Administration, select in the navigation menu Connected equipment.
Next, check the box Use connected equipment and go to Connected equipment.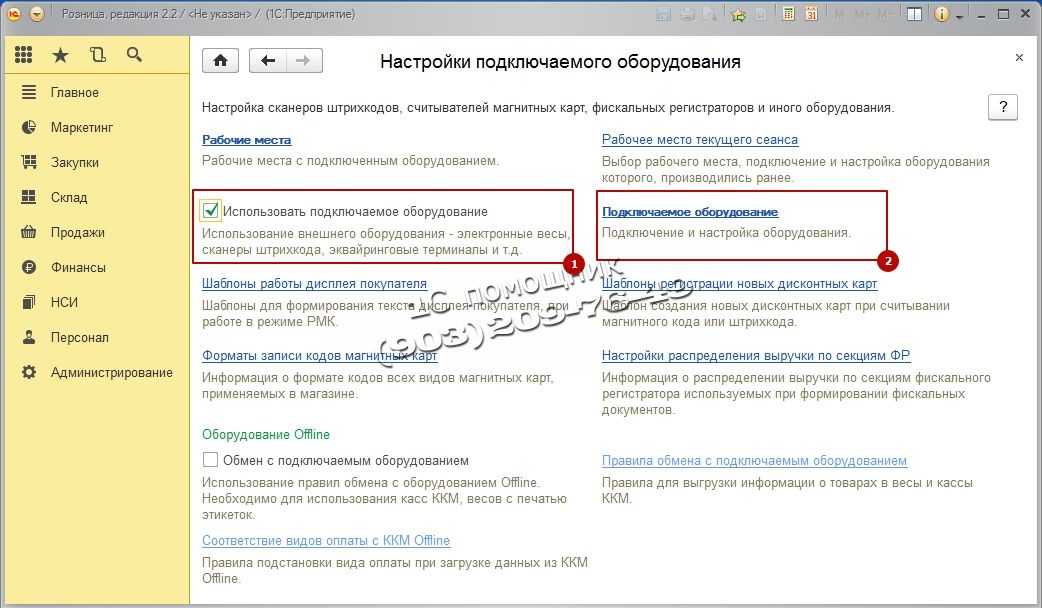
The equipment list is empty, add new equipment. Press the key Create.
Fill out the form that opens: Type of equipment select Fiscal registrars, Hardware Driver select 1C: Fiscal registrar (emulator), put a tick on the item Device in use, click on Record button an object and go to Tune…
If the device driver is not installed on the computer, click: Functions and choose Install the driver. If the driver is installed, then setting the check parameters will appear. They can be changed at your discretion or left as default. 
The next step is to configure KKM cash registers which will punch receipts in your Store. Go to the section Regulatory reference Information(NSI), KKM cash registers and press Create.
Fill in the main points. Cash register type, Store, Name, Workplace, Connected equipment The Fiscal Registrar that we created earlier should appear in the field. Then presses Record and close.
Now we need to add rights to our user to use all the functions of the RMK. This point is very important. Let's go to Administration, Users and Rights and choose Additional user rights. 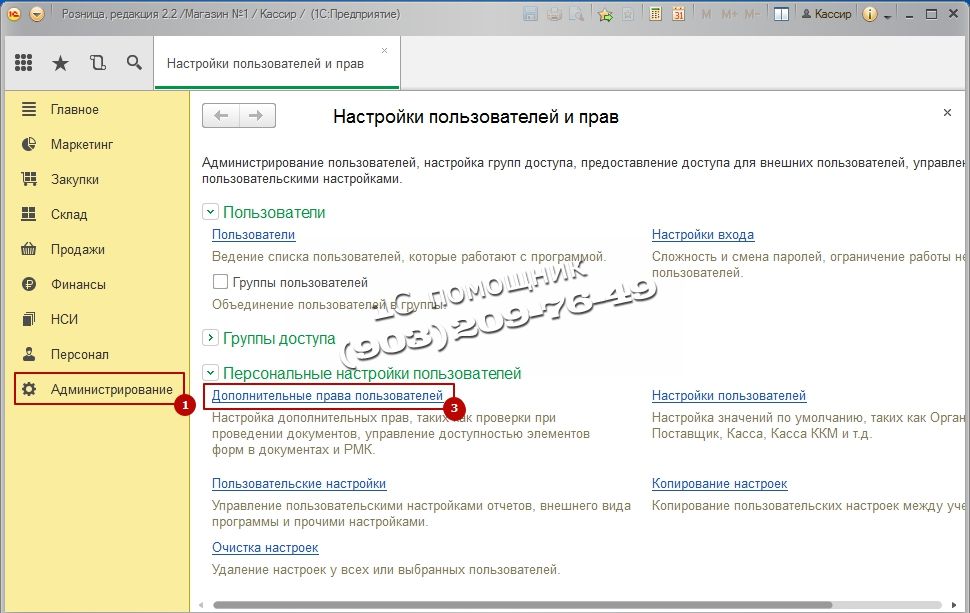 First, let's give the user all rights. Click on Button with green check mark and press Write it down. All necessary rights will be given to the user.
Next, we need to receive the goods into the warehouse; for this we need to create a document Receipt of goods. We take the data to fill out from the supplier’s invoice. Let's go Procurement, select the item Receipts of goods.

A list of all documents will appear Receipts of goods created earlier, in order to create a new document, click Create.
We will not consider in detail how the Goods Receipts document is created; this can be found in the article
To sell goods, we must have installed Retail prices for goods. To do this, after creating and filling out the Goods Receipts document, select Create based on next we choose Setting item prices.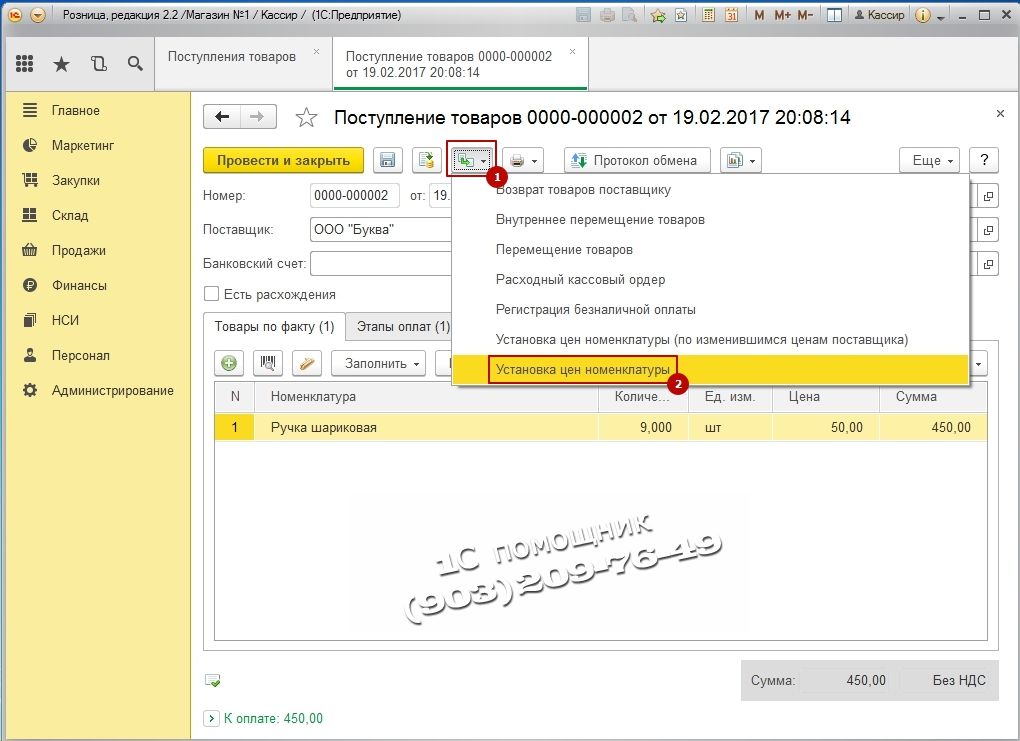
The document will open. This document forms the Purchase and Retail prices. The program itself calculates the price based on the formula we set earlier. Purchasing equal to the receipt price of 50 rubles, and Retail equal Purchasing +50% markup amounted to 75 rubles. You can change the calculated prices manually; to do this, you need to double-click in the price field and then enter your price. To save the document, click Swipe and close.
So we have made the basic settings of the RMK, now we go directly to the Cashier’s Workplace. To do this, go to the section Sales and choose RMK (controlled mode).
The RMK panel opens, initially we need to Open shift, click Opening Shift, and then press Sales registration.
In the window that opens, click the button Menu(F10) When you click on it, the bottom menu will appear, then press the button Search (F11) to select a product from the list. 
In the window that opens Search and selection of goods in RMK turn on the display additional information at prices and balances. To do this, click the button below Show Information.
In the next window, select two checkboxes Show: Remainings and Prices. The current stock balances and retail price will appear at the bottom of the selection. 
Select the product with two mouse clicks and close the product selection window. In the RMK window, enter quantity of goods sold press the button Cash (F6) to make a sale, enter the amount of money deposited, the program will calculate the change and press the button Enter.

Your sales receipt will appear at the bottom right. If you are not using an Emulator, but a real fiscal registrar, then your fiscal registrar will print a Receipt.
After you have worked a working day, you need to close the shift. To do this, exit the RMK by pressing the key Exit(F12). The RMK launch window will open. Now we need to close the cash register shift. Press the button Closing a shift.
The program will ask for confirmation of closing the shift. If you are ready to close the shift, click Yes.
If everything is in order and the sales amounts for the day coincide with sales, press the button Closing a shift.
The cash register is closed. The program will display an information window about the cash register shift. If you are using a real fiscal recorder (not an emulator), it will print you Z-REPORT. 
Introduction
Among the variety of software products for economic and accounting purposes presented today at domestic market, the 1C program is one of the confident leaders. Thanks to such qualities as functional flexibility, adaptability to legal requirements, ease of use, flexible configuration, etc., it is winning more and more users. It is known that the most in demand in the labor market are specialists who are fluent in working with the 1C program, so familiarity with it is one of the important conditions successful professional activity.
The version of the program "1C: Retail 8.2", a description of which we offer the reader, is one of the latest standard solutions from the company "1C". This configuration, compared to analogues available on the market, is a qualitatively new product that allows you to solve a variety of problems: keeping records of retail sales, creating analytical reporting, maintaining commodity accounting, formation primary documentation. The program implements a number of useful functions that greatly facilitate work and meet the most stringent and current requirements of today.
Important!
It is possible that in the process of studying the program, the reader will discover some discrepancy between the contents of this book and what he sees on the monitor screen - after all, the 1C program is constantly being improved and refined (the book covers edition 1.0.10.4). But in any case, these discrepancies will not be fundamental.
In this book, we propose to complete a comprehensive training course in working with the 1C: Retail 8.2 program using 50 lessons, divided into thematic chapters. As you progress through each chapter, the reader will become fully proficient in the relevant techniques and methods of working with the program.
Chapter 1
Getting to know the program and preparing it for work
In this chapter, we will learn about the functionality of the program, consider how it is launched, the creation of an information base and preliminary configuration. These are the main actions preceding the actual operation of the standard solution.
LESSON 1. Purpose and functionality of the program "1C: Retail 8.2"
The standard solution "1C: Retail 8.2" is designed to automate retail business processes retail outlets(stores) that may be included in the distributed retail network trading enterprise. This program allows you to automate accounting inventory in store warehouses and cash accounting at the cash registers of retail outlets (stores).
♦ Functionality The standard solution under consideration provides for the automation of the operations listed below.
♦ Registration of receipt of inventory items from the counterparty to the store warehouses.
♦ Registration of sales of goods and services to customers.
♦ Registration of internal movement of inventory items between stores, internal warehouses of stores, stores and warehouses of a trading enterprise.
♦ Trade in sets of goods created both at the time of sale of the goods and with pre-sale preparation set.
♦ Processing returns of goods from customers, with mechanisms implemented automatic creation necessary documents when returning after closing a cash register shift in cashier workplace mode.
♦ Conducting and processing the results of an inventory of inventory items.
♦ Registration of receipts and expenses cash orders directly in stores.
♦ Preparation of documents for the movement of funds between stores, internal cash registers of stores, stores and cash registers of a trading enterprise.
♦ Preparing sales receipts and, at the end of the shift, a summary report on the cash register, taking into account the returned goods per shift.
♦ Working with acquiring systems, accounting for payments for goods using payment cards, accounting for acquiring agreements and conditions for the return/non-return of a trade concession by the acquirer when returning goods; work with bank loans.
♦ Possibility of using percentage discounts on discount cards (fixed and cumulative discounts), discounts divided by store, discounts to counterparties, discounts on the amount of the check, discounts by validity period, by quantity of goods, by type of payment.
♦ Support commercial equipment: fiscal registrars, data collection terminals, barcode scanners, electronic scales, buyer displays, acquiring systems, magnetic card readers.
A characteristic feature of the “1C: Retail 8.2” configuration is that trading transactions are recorded in it in one currency – rubles.
LESSON 2. Launching an application solution and selecting an information base
After completing the installation of the program in the menu Start its program group will be created. The command used to run the program is 1C Enterprise. For ease of use, it is recommended to display the launch shortcut on the desktop using standard operating system tools.
When the program starts, the window shown in Fig. is displayed on the screen. 1.1.
Rice. 1.1. Starting the program
In this window, you can select the required operating mode, as well as the information base. The 1C program can function in two modes - 1C:Enterprise And Configurator, the selection of the required mode is carried out by clicking the corresponding button in this window. We will learn more about what each mode of operation of the 1C program is, when we complete the corresponding lesson.
The central part of the program launch window contains a list of infobases. When you first start the program, this list may contain an information base with a demo configuration; This base is included in the delivery package and is intended for preliminary acquaintance with the system. The information base is selected by clicking on the corresponding list position. You can add new ones to the list or edit and delete existing information bases - how to do this will be discussed later.
The path to the infobase directory where the cursor is installed is displayed at the bottom of the window.
The procedure for starting the program is as follows: first you need to click on the information base in the launch window, and then click the button 1C:Enterprise or Configurator– depending on the mode in which you want to run the program.
LESSON 3. Operating modes 1C: Enterprise and Configurator
As we already know from the previous lesson, the 1C program can function in two main modes: 1C:Enterprise And Configurator. The required mode is selected by pressing the corresponding button in the launch window (see Fig. 1.1).
Mode 1C:Enterprise– this is the mode of operation of the program in accordance with its purpose. In other words, it is in the mode 1C:Enterprise program users work (accountants, salespeople, managers, warehouse workers, etc.).
Regarding the mode Configurator, then it is intended for setting up and administering the program. Here configuration objects are created and edited, interfaces and dialog boxes are configured, the appearance and content of the printed form of documents is determined, and a number of other actions are performed to set up and configure the system. In most cases with Configurator an administrator works because it requires specific knowledge.
In this book we will not consider issues of program configuration - a separate book is needed to cover this topic. Moreover, the average user is not recommended to make changes to the Configurator: its unskilled editing can violate the integrity of the data, and generally lead to unpredictable consequences.
Please note that some simple and accessible settings are included in the operating mode 1C:Enterprise. The user can edit these parameters independently (it is recommended to inform system administrator), and we will learn how this is done when completing the corresponding lesson.
LESSON 4. Working with information bases (creating, selecting, deleting)
To start using the program, when you first launch it, you need to create an information base in which all data will be stored and with which you will work.
Information bases created on the basis of the "1C: Retail 8.2" configuration have the ability to work in distributed information base mode with a clear division of document flow between stores, where information on all stores in the network is consolidated in the main node of distributed information bases. Mechanisms for automatic initiation of exchange are provided.
Along with distributed information bases, the 1C: Retail 8.2 configuration can automatically exchange data with the management information system (back-office) in duplex mode.
The “Trade Management” configuration, edition 10.3, can be used as the control system for the “1C: Retail 8.2” configuration. IN control system you can create an unlimited number of “Retail” configuration nodes, which, in turn, can be the main nodes of a distributed information base.
Mechanisms are provided for administering information base users of remote nodes of a distributed information base from the main node of the "1C: Retail 8.2" configuration by the system administrator. For example, in the main node of a distributed infobase, the system administrator can create (edit, assign roles, interfaces, reset passwords) an infobase user of a remote node, and he also has access to up-to-date information about the settings of infobase users (made in the mode Configurator or 1C:Enterprise) directly in the nodes of the distributed information base.
To switch to the information base creation mode, you must press the button in the program launch window (see Fig. 1.1) Add– as a result, the window shown in Fig. will open on the screen. 1.2.
Rice. 1.2. The first stage of adding an information base
In this window, using the switch, you need to indicate how the information base should be created. If you are just starting to work with the 1C program, and information bases have not been created until now, you need to set the switch to the position Creating a new information base to form a new empty base for subsequent work. The second option is intended for connecting a previously created information base.
To go to next stage click the button Further. When creating a new information base, a window will appear on the screen, which is shown in Fig. 1.3.
Rice. 1.3. Choosing a method for creating an information base
If you need to create an infobase based on an existing template (for example, based on a demo configuration), you need to set the switch to Creating an infobase from a template. In this case, a list of available configurations and templates will be displayed below, in which you need to select the required position by clicking the mouse and clicking the button Further.
If you select the second option (lower position of the switch), an information base without configuration will be created. It will be possible to subsequently connect the required configuration from the corresponding external file to it (this is done in the Configurator).
Rice. 1.4. Entering the name and type of infobase location
In this window in the field Specify the name of the infobase You need to enter an arbitrary name of the database to be created using the keyboard. Under this name, the infobase will subsequently be displayed in the list of infobases in the program launch window (see Fig. 1.1).
Using the switch below, you need to indicate where the created database will be located. In most cases this is either a computer or a local network, so by default the switch is set to On this computer or on a computer in local network . After pressing the button Further The window shown in Fig. 1 opens on the screen. 1.5.
Rice. 1.5. Path to the infobase directory
This window specifies the path to the directory in which the infobase files will be stored. In Fig. 1.5 shows the path that the program offers by default. To change it, click the selection button located at the end of this field. As a result, a window will open on the screen Directory selection, in which, according to the usual Windows rules, the required path is indicated (if necessary, you can create a new directory).
In field Language (Country) The language of the created infobase is selected from the drop-down list. By default, this field offers the value Russian Russia).
The process of creating an information base is completed by clicking the button in this window Ready.
To change the parameters of the infobase, you need to select it in the launch window (see Fig. 1.1) by clicking the mouse and clicking the button Change, and then make the required adjustments step by step.
Deleting infobases is also carried out in the program launch window (see Fig. 1.1). To do this, select the database to be deleted with a mouse click and press the button Delete. In this case, the program will issue an additional request to confirm the deletion operation.
Remember that to operate the program you must have at least one infobase.
In this video collection I will try to create a truly simple and understandable tutorial for beginners in mastering the program. Each video lesson will cover a specific topic: from initial introduction to the program to filing tax reports.
By the way! Our specialists have worked hard to write a large number of step by step instructions according to the 1C Accounting program - .
I'll probably start with personal experience and I’ll give you a couple of tips on how to quickly learn the program and not get lost in it.
It's always scary to start working right away with real company data in a real database. And this fear has a basis - pressing a couple of extra buttons can lead to the destruction of data for many years, the cancellation of days off for the next month or two. Yes, and nerves are not unnecessary.
An ordinary empty 1C Accounting database will help you overcome fear and become more confident (about how to create it). Before working in the “live 1C database”, a beginner simply needs to go through all the operations from A to Z: configure the program, create new organization, create counterparties, accounts, sales, calculate costs, close the month, prepare reports, etc.
You will encounter many problems, in the course of which you will begin to solve understand the program. The most important thing is that you will understand the full relationship between clicking “some kind of checkmark” and the result in the reporting. But when you click “this checkmark” at the beginning of the quarter, then, of course, you won’t remember about it at the end of the quarter. ( Of course, a description of all the program parameters is in the literature, but what kind of our compatriot reads the instructions? 🙂)
If you have already completed such a “young fighter course,” then do not delete your training base, but always keep it at hand. You can always build test case and check how the program behaves in one case or another.
It can be very useful to create a copy of the working database and train on it. Believe me, many Accountants with even 20 years of experience in dealing with 1C carry out experiments on test bases before important procedures.
Videos and articles on 1C
Necessarily subscribe to our channel on Youtube , we regularly release new videos!
Video tutorial playlist on YouTube, where the most popular operations in 1C Accounting are sequentially analyzed:
If you are unable to view videos, read our articles online.
This section contains a classifier of information and reference information used in maintaining 1C: Retail 8 to record transactions. They contain information documentation for permanent use; if necessary, it is possible to make changes to the contents of the directory, as well as their removal. Data from program directories can be divided into two groups: the first group is used to create a business transaction, the second is used for quick data entry. The second group or additional directory has a basic classifier, contains an all-Russian directory: directory of addresses - stores postal addresses, a unified scheme and content of addresses; lists of countries of the world; bank information; contact information. It is possible to purchase the program at affordable price and obtain a license to update all types and types of directories.
Warehouse accounting operations - acceptance to the warehouse, warehouse inventory, write-off of inventory items, shipment of inventory items can be processed using a receipt-order scheme or without it. When accounting using receipt orders, the preparation of documentation is carried out by the responsible person, the warehouse manager keeps records of the amount of goods and materials received. If you decide to buy the program online, then you will have the opportunity to manage organized deliveries to a retail chain of stores. In the “retail” section, you can find out the range of missing goods on warehouse shelves, and generate documents for orders from suppliers, and draw up documentation for movement between retail outlets, thus, it is possible to use the function of decentralized and partially organized management of all receipts of goods.
IN software product the function of maintaining records of the warehouse for receiving products, issuing products from warehouse premises, inventory activities and deregistration of the warehouse was organized. Documentation implies an accounting scheme created by the warehouse employee, and with receipt documents, the warehouse records the movement of products. Products in the warehouse are valued at selling prices to assess inventory value. You can buy 1C: Retail 8 in Moscow and use separate settings for each point of sale. If the sales locations have their own storage location, then it is possible to directly redistribute incoming products to the storage location, as well as internal movement using a semi-automatic mode. Using the “store” settings, you can determine which warehouse the goods arrived at. It can be configured so that all receipts and expenses for each store are taken into account separately. The 1C program, using data processing, forms the movement and display of goods in departments.
The program allows you to create and manage lists of users who have access to information system. For the program to work, users can be issued personalized registration cards, which, when used, allow access to the cashier’s desktop. Buy online 1C with the ability to recognize barcodes and magnetic cards, administrator retail space it is possible to plan the working time of each shift with the number of managers per shift. The program keeps track of the work time of each employee and analyzes the quality of time used during the work shift. The software product also uses sales accounting for each manager to further motivate employees.
The program supports working with barcode scanning equipment. The barcode of product positions is intended to automatically obtain information about products. The system recognizes and stores barcodes of various types of manufacturers CODE 128, CODE 39, EAN 128, EAN 13, EAN 8. The ability to store manufacturer codes allows you to generate your own barcode for any product, whether for weight or piece, within the information data. It is possible to set specific barcodes for a unit of measurement and for a packaged product.
The purpose of marketing in 1C: Retail 8: retail activities organization is to compile an assortment so that numerous customers make purchases in the store, and the cost part is for support assortment policy must be minimized. To achieve this task, the marketing function gives you ways to control purchasing information: the ability to identify consumer groups. Ability to control the variety of goods: creating a variety of offers that correspond to customer requests. Pricing: educational opportunity pricing policy organizations. Control of marketing campaigns: introduction of new products, provision of discounts to consumers and various promotions.
The program implements the ability to account various types cash and non-cash payments in cash, it is also possible to issue consumer loans and gift certificates. It is possible to configure certificate accounting. You get the opportunity to account for consumer loans, payment cards, with the help of which payment for goods is carried out, control is carried out by forming cash receipt and receiving a Z-report when closing a shift. Accounting for money is carried out at the place where it is stored, and is transferred to the head office for storage.
The “retail” section will allow you to open a special user workplace to organize the registration of operations for the sale of products. The working window can be used on touch screens of tablet computers. In accordance with the rules used by the organizations retail, you can configure restrictions or access for cashiers only to basic retail functions. This function leaves the opportunity for the user to print receipts when selling products to various clients cash register equipment, print UTII documentation on office equipment. Rules for the sale and write-off of warehouse products are set when setting up the program.
The 1C: Retail 8 program ensures internal exchange of information using database distribution technology and autonomous operation of retail outlets and cash registers in the event of communication failure. The “retail” function provides data transfer to the “sales management” section and back, buy online 1C edition 11 and “Enterprise Accounting”, editions 2.0 and 3.0. when using all three functions, it is necessary to configure the information exchange of databases between “Implementation Management”, “Implementation Management” and “Enterprise Accounting”.
This configuration allows users to take advantage of a range of analytical reporting, including reports on sales of product sales, reports by type of payment, cash transactions cash register equipment, number of printed receipts, number of product returns. In 1C, all reports are divided into separate groups: sales report, retail sales, on payment, on return.